
Christmas crafts are the perfect DIY activity for adults and kids using Dollar items to save money on Christmas decorations and Christmas gifts. Making crafts offers a wonderful opportunity to bond with loved ones, unleash your creativity, and spread the festive cheer. These easy to make Dollar Store Christmas Crafts are fun for the entire family. From wooden, primitive, and more, you will have so much fun making these DIY projects that you can sell, give as Christmas Gifts, and add to your Christmas Decor.

The Best Christmas Crafts To Try This Year
‘Tis the season to get crafty! The holiday spirit is in the air, and what better way to celebrate than by diving into some delightful Christmas crafts?
Whether you’re a seasoned DIY enthusiast or just looking for a fun project to enjoy with family and friends, crafting during the holiday season is a fantastic way to add a personal touch to your decorations, gifts, and celebrations.
From decking the halls with handcrafted ornaments to creating unique and heartfelt gifts, Christmas crafts offer a world of creative possibilities.
In this post, we’ll explore several festive Christmas Craft Ideas that you can use some Dollar Store supplies to create, and step-by-step instructions to spark your imagination and make this holiday season truly magical. So, gather your supplies, get into the holiday spirit, and let’s embark on a jolly crafting journey together!
1. Handmade Christmas Cards
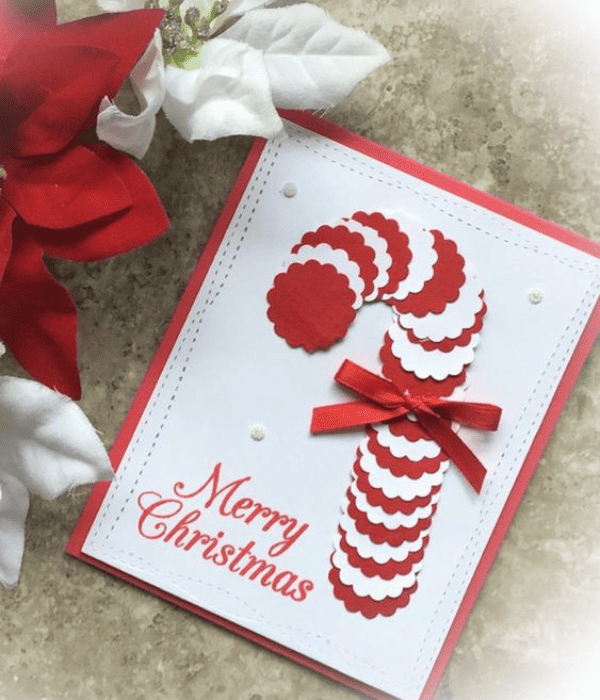
Creating a Christmas card with candy cane cutouts is a cute and festive way to send holiday greetings. Here’s a step-by-step guide to making one:
Materials You’ll Need:
Red and white cardstock or construction paper
Craft glue or double-sided tape
Red Ribbon
Steps:
1. Prepare Your Card:
Start with a blank cardstock or a pre-made blank card in the size and color of your choice.
2. Cut Out Candy Canes:
Use a craft holes punch to cut the red and white cardstock into wavy circles to shape the candy cane.
3. Assemble the Candy Cane:
Glue or tape the white and red circles into a candy cane shape to create the candy cane design onto the white and red layered cardstock.
4. Add a Greeting:
Write a festive holiday greeting outside or inside the card using colored markers or pens. Consider phrases like “Wishing you a sweet holiday season!” or “Merry Christmas!”
5. Decorate (Optional):
You can further embellish your card with holiday-themed stickers, glitter, red ribbon or any other decorations you like.
A Christmas card with candy cane cutouts is an adorable Christmas craft to share the sweetness of the season with your loved ones. It’s a personalized and creative touch that adds a festive flair to your holiday greetings.
2. DIY Advent Calendar
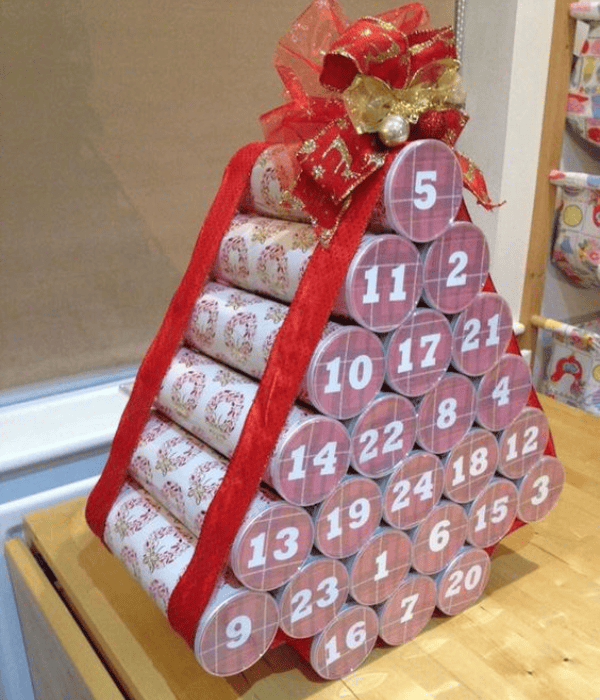
Making a DIY advent calendar using Pringles chip cans is a fun and eco-friendly way to count down the days until Christmas. Here’s a step-by-step guide to making one:
Materials You’ll Need:
Empty Pringles chip cans (as many as you need for the number of days in your calendar)
Wrapping paper or colored craft paper
Scissors
Craft glue or double-sided tape
Ribbon or string
Number stickers or markers
Small treats, candies, or tiny gifts for each day
Optional: holiday-themed stickers, embellishments, or paint for decoration
Steps:
1. Prepare the Pringles Cans:
Make sure the Pringles cans are empty and clean. Remove any remaining labels and wash the cans thoroughly. Let them dry completely.
2. Wrap the Cans:
Cut pieces of wrapping paper or colored craft paper to fit around each Pringles can.
Use craft glue or double-sided tape to secure the paper around each can, covering the entire exterior.
3. Decorate the Cans (Optional):
Add decorative touches to the wrapped cans. You can use holiday-themed stickers, paint, or other embellishments to make each can unique.
4. Number the Cans:
Assign a number to each can, from 1 to the total number of days in your advent calendar. You can use number stickers, markers, or even print out numbers and glue them to the cans.
5. Fill the Cans:
Place a small treat, candy, or tiny gift inside each can. Be sure the treats are small enough to fit through the Pringles can opening.
6. Seal the Cans:
Seal the top of each can with craft glue or tape to keep the surprises hidden until each day.
7. Create a Display:
Arrange the Pringles cans in a creative display. You can stack them in the shape of a Christmas tree, line them up on a shelf, or attach them to a piece of cardboard in a festive pattern.
8. Attach Ribbon or String:
To easily open the cans, attach a ribbon or string to each pull tab. This will allow you to pull out the treats inside without damaging the cans.
9. Start Counting Down:
Beginning on December 1st, open one Pringles can each day to reveal the surprise inside, counting down the days until Christmas.
A DIY advent calendar using Pringles chip cans not only recycles materials, but also adds a touch of creativity and anticipation to your holiday celebrations. It’s a great Christmas craft to make the countdown to Christmas even more exciting for family members or friends.
3. Festive Christmas Wreaths

A “Merry and Bright” pizza pan Christmas wreath is a fun and imaginative holiday craft project that adds a festive touch to your décor. Here’s a step-by-step guide to making one:
Materials You’ll Need:
Pizza pan (you can use an old one or purchase a new one at Dollar Tree)
Black and white plaid vinyl paper (available at Dollar Tree)
White, green, and red acrylic paint
Paintbrushes
String lights or battery-operated LED lights
“Merry and Bright” stencil, vinyl letter stickers, or wood letters
Hot glue gun and glue sticks
Ribbon or bow for decoration
Drill and drill bit (if you want to add holes for the lights)
Steps:
1. Prepare the Pizza Pan:
Clean the pizza pan to remove any grease or residue.
If your pizza pan has a non-stick coating, you may want to sand it lightly to create a better surface for paint adherence.
2. Attach the Vinyl:
Measure and cut the plaid vinyl to fit the center of the pan. Remove backing and attach to the center.
3. Add “Merry and Bright” Message:
Either use a stencil, apply vinyl letter stickers, or wood letters to spell out “Merry and Bright” on the pizza pan. Position it in the center or wherever you prefer.
4. Drill Holes for Lights (Optional):
If you want to add lights to your wreath, use a drill to create evenly spaced holes around the outer edge of the pan. These holes should be large enough to insert the lights.
5. Attach Lights:
If you drilled holes, insert the string lights or battery-operated LED lights through the holes, securing them with hot glue on the backside of the pan.
6. Add a Bow:
Attach a festive ribbon or bow at the top of the wreath for an extra decorative touch.
7. Hang Your Wreath:
Attach a loop of ribbon or wire to the back of the wreath for hanging, and find the perfect spot to display your “Merry and Bright” pizza pan wreath.
This Christmas craft not only recycles a pizza pan into a festive decoration but also allows you to customize it with your preferred colors and designs. It’s a creative way to add a touch of holiday cheer to your home, spreading the message of “Merry and Bright” to all who see it.
4. Personalized Christmas Ornaments

Creating a personalized clear teacher ornament filled with erasers is a thoughtful and unique gift idea for educators. Here’s how you can make one:
Materials You’ll Need:
Clear, plastic or glass ornament with a removable top
Miniature erasers in various shapes and colors
Small decorative items like mini chalkboard, apple charms, or pencil charms
Paper for a personalized message
Twine or ribbon
Scissors
Funnel (optional)
Steps:
1. Select Your Erasers:
Choose a selection of miniature erasers in fun colors and school-themed shapes like apples, pencils, books, or other items commonly associated with teaching.
2. Prepare the Ornament:
Remove the top of the clear ornament to create an opening.
3. Fill the Ornament:
Using a funnel or by carefully pouring, fill the clear ornament with the miniature erasers. You can mix and match colors and shapes for added visual appeal.
4. Add Decorative Items:
Include small decorative items like a mini chalkboard, apple charms, or pencil charms. These can be placed on top of the erasers inside the ornament.
5. Write a Personalized Message:
On a small piece of paper, write a personalized message to the teacher. It could be a simple “Thank You” or a heartfelt note of appreciation.
6. Roll and Insert the Message:
Roll up the personalized message and insert it into the ornament. You may need to use a pencil or skewer to help position it.
7. Replace the Top:
Carefully put the top back on the ornament to seal it.
8. Add a Ribbon:
Attach a ribbon or twine to the top of the ornament, creating a loop for hanging.
9. Personalize the Ornament:
If you have a vinyl cutter such as a Cricut machine or access to vinyl letter stickers, you can personalize the outside of the ornament with the teacher’s name or a special message.
10. Present the Gift:
Gift the personalized teacher ornament to your favorite educator, and watch their face light up with appreciation.
This personalized clear teacher ornament filled with erasers is not only a thoughtful gesture but also a practical and decorative Christmas craft keepsake that teachers can hang in their classroom or on their Christmas tree. It’s a sweet way to express gratitude for their hard work and dedication to education.
5. Gingerbread House Decorating
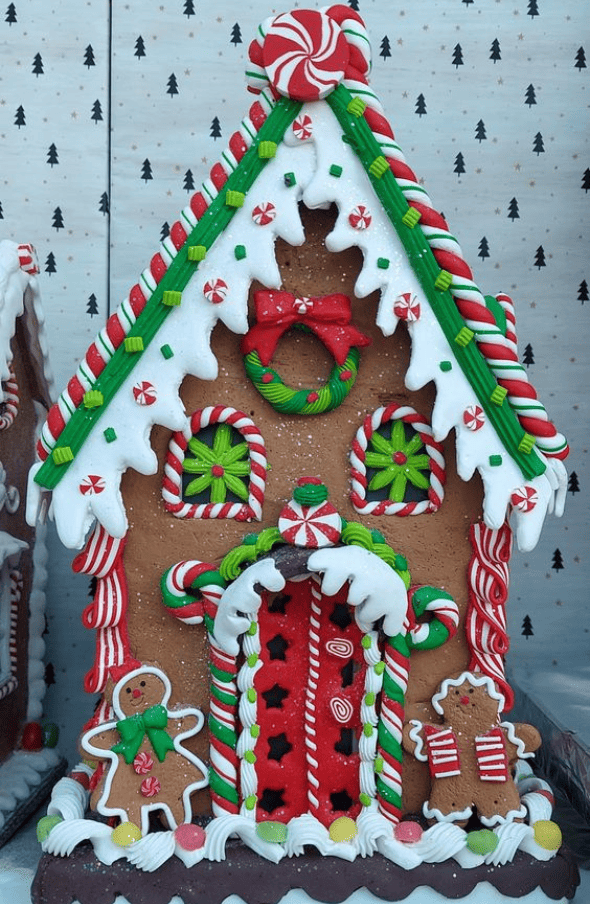
Decorating a gingerbread house is a beloved holiday tradition that allows for creativity and imagination. Here’s a step-by-step guide to decorating a gingerbread house:
Materials You’ll Need:
Pre-made gingerbread house kit or homemade gingerbread pieces
Royal icing (powdered sugar, egg whites, and lemon juice)
Assorted candies (gumdrops, peppermints, candy canes, licorice, etc.)
Small pretzels or cereal (for shingles or roof texture)
Miniature chocolate chips or raisins (for windows and decorations)
Food coloring (for tinting the icing)
Piping bags or zip-top bags (for applying icing)
Decorating tips (optional, for more intricate designs)
A sturdy base or plate for building the house
Wax paper or parchment paper (to prevent sticking)
Decorative items like coconut flakes (for snow), powdered sugar (for a powdered snow effect), and small figurines (if desired)
Steps:
1. Assemble the Gingerbread House:
If you’re using a pre-made kit, follow the package instructions for assembling the gingerbread house. If you’re making your own gingerbread pieces, ensure they’re fully cooled and ready to assemble.
2. Prepare Royal Icing:
In a mixing bowl, combine powdered sugar, egg whites, and lemon juice. Beat until the icing reaches a thick, smooth consistency. You can adjust the thickness by adding more powdered sugar or a few drops of water if it’s too thick.
3. Tint the Icing (Optional):
Divide the icing into small bowls and add food coloring to achieve the desired colors for decorating.
4. Decorate the House:
Use the colored icing to attach candies and decorations to the gingerbread house. Start with the roof and walls and work your way down. Be as creative as you like, making windows, doors, shutters, and pathways.
5. Use Icing as Glue:
Remember that royal icing acts as glue, so use it generously to attach candies securely.
6. Add Roof Shingles:
If you’re using small pretzels or cereal for roof shingles, apply icing to the roof and press them into place in rows, overlapping slightly.
7. Decorate the Yard:
Place your gingerbread house on a sturdy base, and use icing to create a yard. You can add a snowy effect using coconut flakes or powdered sugar.
8. Add Final Touches:
Place figurines or small holiday-themed decorations in the yard for an extra festive touch.
9. Let It Dry:
Allow the icing to dry and harden for several hours or overnight to ensure everything is set.
10. Display Your Masterpiece:
Once your gingerbread house is dry and secure, proudly display it as a centerpiece or part of your holiday decor. It’s also a delightful treat to share with family and friends during the festive season.
Decorating a gingerbread house is a wonderful Christmas craft to embrace the holiday spirit and let your creativity shine. Whether you go for a classic design or let your imagination run wild, it’s a festive and enjoyable activity for all ages.
6. Hand-Painted Gift Wrap
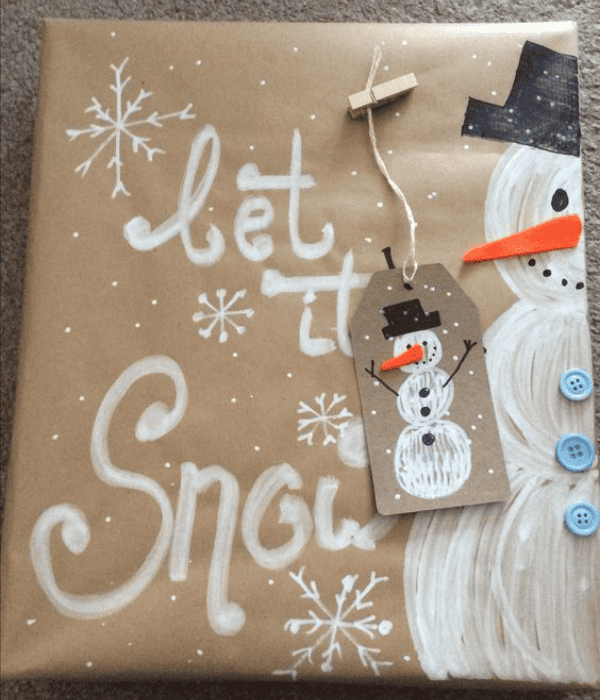
Hand-painted brown gift wrap for Christmas is a wonderful way to add a rustic and personal touch to your holiday presents. Here’s how to create your own hand-painted brown gift wrap:
Materials You’ll Need:
Brown kraft paper or brown wrapping paper rolls
Acrylic paints in festive colors (red, green, white, gold, silver, etc.)
Paintbrushes in various sizes
Water and a palette or disposable plate for mixing paint
Stencils, stamps, or other design tools (optional)
Painter’s tape (to create clean lines, if desired)
Holiday-themed stencils or stickers (optional)
Ribbon, twine, or gift tags (for finishing touches)
Steps:
1. Prepare Your Workspace:
Lay down newspaper or a plastic tablecloth to protect your work surface from paint splatters.
2. Cut and Measure the Paper:
Roll out the brown kraft paper to the desired length for your gifts and cut it accordingly.
3. Plan Your Design:
Decide on the Christmas-themed design you want to paint on the wrapping paper. This could include a snowman, holiday trees, ornaments, snowflakes, reindeer, stars, or even simple abstract patterns.
4. Mix Your Paints:
Squeeze your chosen acrylic paint colors onto a palette or disposable plate. If you need different shades, mix them by adding small amounts of other colors.
5. Paint Your Design:
Use paintbrushes to apply your Christmas design to the brown wrapping paper. Be creative with your color choices and design elements. Paint the entire sheet or create patterns and borders as you like.
6. Use Stencils or Stamps (Optional):
If you want to incorporate specific holiday images, use stencils or stamps to add details like snowflakes or ornaments. These can provide a more structured and festive look.
7. Add Extra Elements (Optional):
You can enhance the appearance by applying holiday-themed stencils, stickers, or even small ornaments to the painted paper. This adds extra charm to your gift wrap.
8. Allow to Dry:
Let the painted gift wrap dry completely before wrapping your presents to avoid smudging the paint.
9. Wrap Your Gifts:
Once the hand-painted brown gift wrap is dry, use it to wrap your Christmas presents. Secure the paper with tape or twine.
10. Finish with Decorations:
Add a final festive touch by decorating your gifts with ribbons, twine, or holiday-themed gift tags.
Hand-painted brown gift wrap for Christmas not only adds a personal and artistic element to your presents but also exudes a rustic and cozy feel that captures the essence of the holiday season. It’s a creative and heartfelt Christmas craft to make your gifts stand out under the tree and convey your warmest holiday wishes.
7. Yarn-Wrapped Christmas Trees
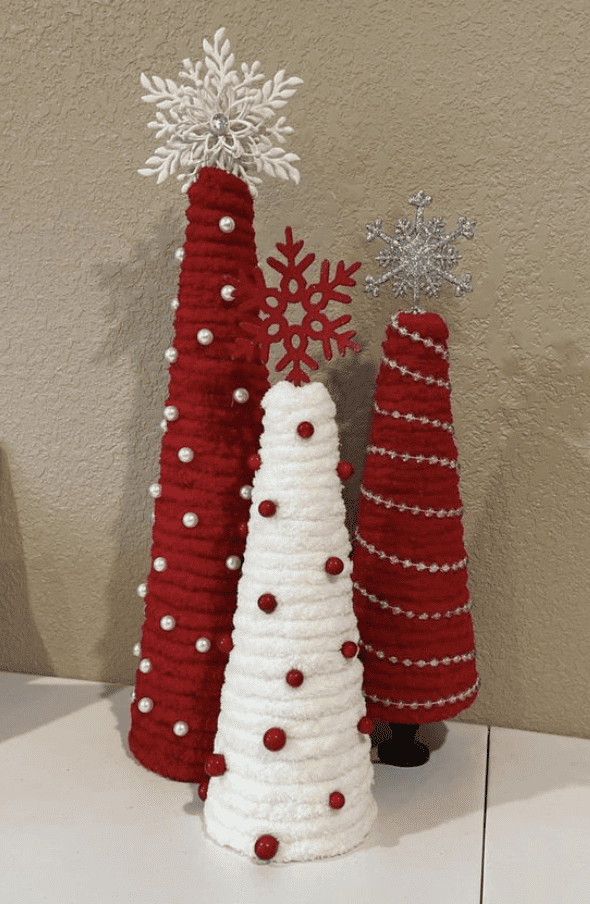
Yarn-wrapped Christmas trees are a rustic farmhouse DIY holiday decoration that can add a cozy and festive touch to your home. These yarn-wrapped trees are easy to make and can be customized to match your holiday decor. Here’s how to create yarn-wrapped Christmas trees:
Materials You’ll Need:
Cone-shaped forms: You can use foam cones, cardboard cones, or even DIY cones made from rolled-up poster board.
Yarn: Choose yarn in your preferred colors. Traditional red, green or white yarn works well for Christmas trees, but you can get creative with different shades.
Craft glue: A strong, fast-drying craft glue will work best for securing the yarn.
Scissors: You’ll need scissors to cut the yarn and trim any excess.
Decorations: Optional embellishments like mini ornaments, tiny bows, or small beads can be added for extra flair.
Steps:
1. Start at the Base:
Begin by applying a small amount of craft glue to the base of the cone-shaped form. This will anchor the yarn.
2. Secure the Yarn:
Press the end of the yarn onto the glued area to secure it. Hold it for a few seconds to ensure it sticks.
3. Wrap the Yarn:
Begin wrapping the yarn around the cone, making sure to keep it tight and close together. You can wrap it in a spiral pattern or create a crisscross pattern for texture.
4. Add More Glue:
As you wrap, periodically add a small amount of craft glue to the cone to ensure the yarn stays in place. Be sure to apply the glue on the backside of the yarn so it doesn’t show.
5. Continue Wrapping:
Keep wrapping until you reach the top of the cone. If you want to create a tree with multiple layers or sections, you can stop and start wrapping at different points on the cone to create distinct sections.
6. Secure the End:
When you reach the top or finish a section, cut the yarn and secure the end with a bit of glue.
7. Add Decorations (Optional):
Once your yarn-wrapped Christmas tree is complete, you can add mini ornaments, bows, or other decorations to enhance its festive look. Simply glue these decorations onto the yarn.
8. Let It Dry:
Allow the glue to dry completely before handling or displaying your yarn-wrapped Christmas tree.
9. Display:
Place your completed yarn-wrapped Christmas trees on a mantel, table, or as part of a holiday centerpiece. You can create multiple trees in different sizes and colors to create a charming holiday scene.
Yarn-wrapped Christmas trees are not only a fun and creative Christmas craft project but also a great addition to your holiday decor. They can be personalized to match your style and color scheme and can be reused year after year.
8. DIY Snow Globes
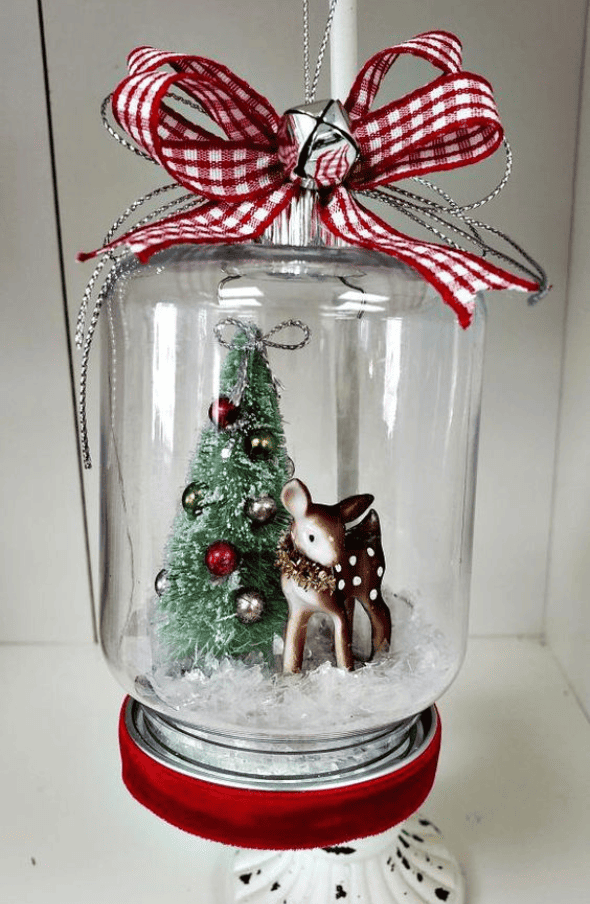
Creating a snow globe with a reindeer and Christmas tree inside is a fun and festive DIY project. Here’s how you can make one:
Materials You’ll Need:
A clear glass or plastic jar with a screw-on lid (mason jars or empty baby food jars work well)
A small plastic or ceramic figurine of a reindeer and a miniature Christmas tree
Glitter or artificial snow
Waterproof glue
Ribbon or twine
Decorative elements (optional, e.g., mini ornaments, tiny bells)
Steps:
1. Prepare the Figurines:
Ensure that the reindeer and Christmas tree figurines are clean and dry. You can paint them or add small decorative elements like tiny ornaments or bells if desired.
2. Attach the Figurines:
Using waterproof glue, carefully attach the reindeer and Christmas tree to the inside of the jar lid. Allow the glue to dry completely.
3. Add Snow and Glitter:
Sprinkle a small amount of glitter or artificial snow into the bottom of the jar. This will create a snowy base for your scene.
4. Mix Glycerin and Water:
In a separate container, mix distilled water and glycerin. A typical ratio is about 1 part glycerin to 3 parts water, but you can adjust it to achieve your desired snowfall effect. Stir well to combine.
5. Fill the Jar:
Carefully fill the jar with the glycerin and water mixture, leaving a small gap at the top. The gap is needed to allow space for the snow globe’s contents to move when shaken.
6. Seal the Jar:
Apply a thin layer of waterproof glue to the inside rim of the jar lid, then screw it tightly onto the jar. Make sure it’s sealed securely to prevent leaks.
7. Decorate the Lid (Optional):
You can add a decorative touch to the lid by tying a ribbon or twine around it. This not only enhances the aesthetic but also helps ensure the lid remains tightly closed.
8. Shake and Enjoy:
Turn your snow globe upside down, give it a gentle shake, and watch as the “snow” falls around the reindeer and Christmas tree. It’s a magical and festive scene to behold.
Your DIY snow globe with a reindeer and Christmas tree inside makes for an adoration holiday decoration or a heartfelt gift. You can customize this Christmas craft with different figurines or jar sizes to create a unique snow globe for the holiday season.
9. Wooden Santa Spoons

Wooden Santa spoons are a charming and whimsical addition to your holiday table setting or Christmas kitchen decor, or a delightful homemade gift for friends and family during the Christmas season. These hand-painted wooden spoons are transformed into jolly Santa Claus figures. Here’s how to make wooden Santa spoons:
Materials You’ll Need:
Wooden spoons (you can use new or upcycled ones)
Acrylic paint in Santa-inspired colors: red, white, black, brown, and pink
Paintbrushes in various sizes
Red felt or fabric
Cotton balls or white pom-poms
Craft glue
Scissors
Steps:
1. Prepare the Wooden Spoons:
Ensure your wooden spoons are clean and dry before starting the project.
2. Paint the Spoon Handles:
Use red acrylic paint to coat the handle of the spoon. You may need to apply multiple coats to achieve full coverage. Let each coat dry completely before adding the next.
3. Paint Santa’s Face:
Paint a pink or brown face on the top part of the spoon and the bottom half with white acrylic paint to serve as Santa’s beard.
4. Add Facial Features:
Use black paint to add Santa’s eyes and mouth. For the eyes, you can either paint small circles or glue on small googly eyes once the paint is dry. Paint a simple curved line for Santa’s smiling mouth.
5. Create Santa’s Hat:
Cut a small triangle or hat shape from red felt or fabric. Glue it to the top of the spoon handle to create Santa’s hat.
6. Add the Pom-Pom:
Glue a small white cotton ball or white pom-pom to the tip of Santa’s hat to mimic the fur trim.
7. Let It Dry:
Allow your wooden Santa spoon to dry completely. This may take a few hours, depending on the thickness of the paint.
8. Finishing Touches:
If desired, you can add additional details like a gold or silver bell to Santa’s hat or a ribbon around his neck.
9. Display or Gift:
Once your wooden Santa spoons are dry and you’re satisfied with the paint job, you can display them in a utensil holder as part of your holiday table setting or attach them to gift packages as a festive embellishment.
Wooden Santa spoons are an easy-to-make Christmas craft that can add a touch of holiday cheer to your dining table or make for a thoughtful and handcrafted gift for loved ones. They are sure to bring smiles and joy during the festive season.
10. Pinecone Christmas Decorations

Creating pinecone Christmas trees is a wonderful and natural way to add rustic charm to your holiday decor. These DIY decorations are simple to make and can be customized to suit your style and space. Here’s how to make pinecone Christmas trees:
Materials You’ll Need:
Pinecones (you can collect them from nature or purchase them at a craft store)
Green acrylic paint or spray paint
Mini wood slices (for the tree bases)
Craft glue or hot glue gun and glue sticks
Decorative items like mini ornaments, tiny bows, or small beads
Ribbon, twine, or garland (optional)
Small wooden or foam stars (optional)
Craft moss (optional, for a woodland effect)
Steps:
1. Prepare the Pinecones:
If you collected pinecones from nature, ensure they are clean and dry. You can also bake them at a low temperature (200°F or 93°C) for about 30 minutes to kill any insects or remove excess moisture.
2. Paint the Pinecones:
Leave them their natural color or apply green paint to the pinecones using a paintbrush or spray paint. Ensure the paint covers the pinecone scales evenly. Let them dry completely.
3. Create the Tree Bases:
Hot glue the pinecone to your mini wood slice.
4. Decorate the Trees:
Once the tree base is secure, you can start decorating your pinecone Christmas trees. Use craft glue or a hot glue gun to attach mini ornaments, tiny bows, small beads, or other decorations to the pinecone branches.
5. Add a Tree Topper (Optional):
If you’d like, you can glue a small wooden or foam star to the top of the pinecone as a tree topper.
6. Wrap Garland or Ribbon (Optional):
Wind garland or ribbon around the pinecone branches to add extra festive flair. You can secure it with a dot of glue here and there.
7. Let It Dry:
Allow your decorated pinecone Christmas trees to dry completely before moving or displaying them.
8. Display Your Trees:
Arrange your pinecone Christmas trees on a mantel, table, or as part of a holiday centerpiece. You can create a forest of these charming trees for a cozy, rustic holiday atmosphere.
Pinecone Christmas trees are a wonderful DIY Christmas craft that combines the beauty of nature with holiday decorations. They are versatile, customizable, and can be made in various sizes to suit your decorating needs. Whether you place them indoors or use them to adorn your outdoor spaces, these pinecone trees add a touch of natural elegance to your holiday decor.
11. Pom-Pom Christmas Wreath
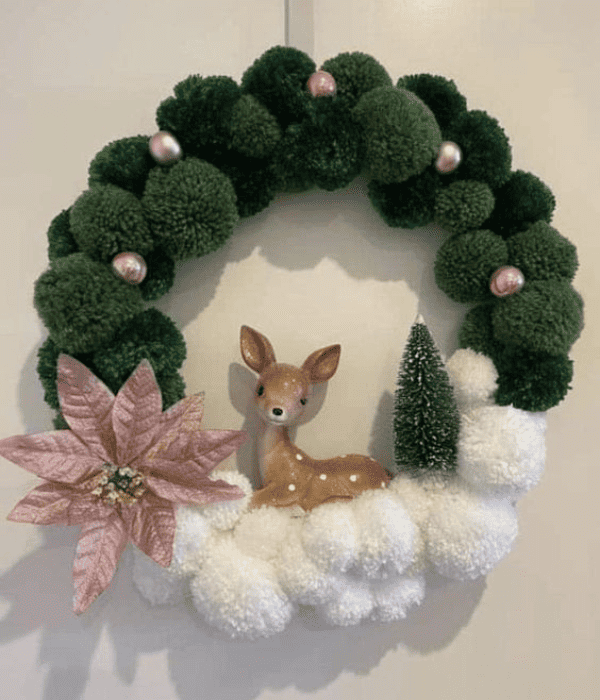
A pom-pom green and white Christmas wreath is a cute craft project that can add a touch of holiday cheer to your home. Here’s how to make one:
Materials You’ll Need:
Foam wreath form (choose your preferred size)
Scissors
Hot glue gun and glue sticks
Red ribbon (for hanging)
Optional: Small ornaments, pinecones, or decorative elements
Steps:
1. Wrap the Wreath Form:
Start by securing the end of the green yarn to the foam wreath form using hot glue.
Begin wrapping the yarn around the wreath form, making sure to cover it completely. You can alternate between green and white yarn or create a pattern of your choice. Keep the wraps close together to achieve a full and fluffy look.
Continue wrapping until the entire wreath form is covered. Secure the end of the yarn with hot glue.
2. Create Pom-Poms:
Make a bunch of green and white pom-poms using the yarn. You can use a pom-pom maker or create them by hand. Here’s a simple way to make them:
Wrap the yarn around your fingers (about 50 times for a full pom-pom).
Carefully slide the yarn off your fingers and tie a piece of yarn tightly around the center of the loop.
Cut the loops on both ends and fluff out the pom-pom.
Create enough pom-poms to cover the wreath.
3. Attach the Pom-Poms:
Use hot glue to attach the pom-poms to the yarn-wrapped wreath form. You can place them randomly or in a pattern, depending on your preference. Make sure they are securely attached.
4. Add Decorative Elements (Optional):
To further decorate your wreath, you can glue on small ornaments, reindeer and Christmas tree figurines, pinecones, or other decorative elements. Arrange them to your liking and secure them with hot glue.
5. Add a Ribbon Hanger:
Cut a length of ribbon and create a loop. Glue the ends of the loop to the back of the wreath as a hanger.
6. Final Touches:
Inspect your wreath and make any necessary adjustments or additions. Ensure that all the pom-poms and decorations are securely attached.
7. Hang and Display:
Your pom-pom green and white Christmas wreath is now ready to hang and display. Choose a prominent spot on your door or wall to showcase your festive creation.
This DIY Christmas wreath will add a touch of holiday magic to your home. The combination of green and white pom-poms gives it a cheerful and wintery feel.
Making it a perfect addition to your Christmas decor. Feel free to customize this Christmas craft with your own creative touches to match your holiday style. At its center, a miniature deer figurine and a tiny Christmas tree.
12. Cinnamon Stick Ornaments
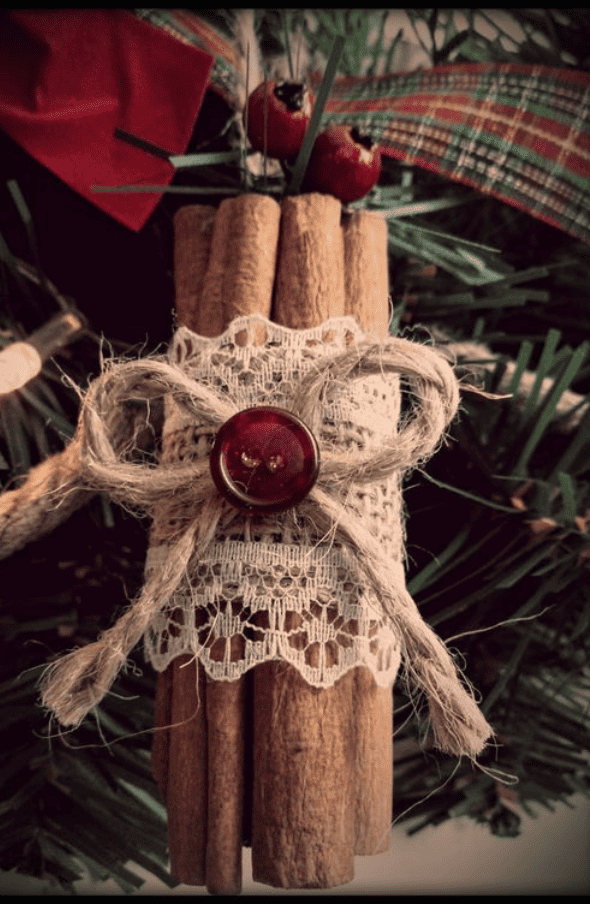
Cinnamon stick ornaments are a Christmas craft that not only adds a festive scent to your home but also creates cute decorations for your tree, gifts, or home decor. Here’s how to make cinnamon stick ornaments:
Materials You’ll Need:
Cinnamon sticks (available at craft stores or online)
Ribbon or twine (for hanging)
Cookie cutters or templates for shaping
Craft glue or a hot glue gun and glue sticks
Small decorations like buttons, small ornaments, beads, or dried flowers (optional)
Acrylic paint and paintbrushes (optional)
Clear sealer spray (optional, to preserve the cinnamon scent)
Steps:
1. Gather Your Supplies:
Ensure you have all the necessary materials and tools ready to start your cinnamon stick ornaments.
2. Choose Your Shapes:
Decide on the shapes you want for your ornaments. You can keep them as is or use cookie cutters, templates, or freehand your designs. Common shapes include stars, hearts, gingerbread people, and Christmas trees.
3. Cut the Cinnamon Sticks:
Measure and cut the cinnamon sticks to match the size of your chosen shapes. You can use scissors or pruning shears to cut them cleanly.
4. Create Your Ornaments:
Use craft glue or a hot glue gun to attach the cinnamon sticks together to form your chosen shapes. Hold them in place until the glue sets. You can create simple shapes or more intricate designs by arranging the sticks in different ways.
5. Add Decorations (Optional):
If you’d like to embellish your ornaments, you can glue on small decorations like buttons, beads, dried flowers, or mini ornaments. Get creative with your designs!
6. Paint (Optional):
If you wish to add a pop of color to your ornaments, you can paint them with acrylic paint. Let the paint dry completely before proceeding.
7. Create Hanging Loops:
Cut pieces of ribbon or twine to your desired length for hanging. Form a loop and attach it to the back of each ornament with glue.
8. Seal the Ornaments (Optional):
To preserve the cinnamon scent and protect the ornaments, you can spray them with a clear sealer spray. This step is optional but can extend the life of your cinnamon stick ornaments.
9. Let Them Dry:
Allow your ornaments to dry thoroughly before handling or hanging them.
10. Hang or Decorate:
Once your cinnamon stick ornaments are dry and complete, you can hang them on your Christmas tree, adorn gifts with them, or use them to decorate your home. Their lovely scent will infuse a warm and festive ambiance into your space.
Cinnamon stick ornaments are not only beautiful but also add a cozy and aromatic touch to your holiday decor. They make wonderful homemade gifts and can be cherished year after year as a cherished holiday Christmas craft tradition.
13. DIY Snowman Wreath
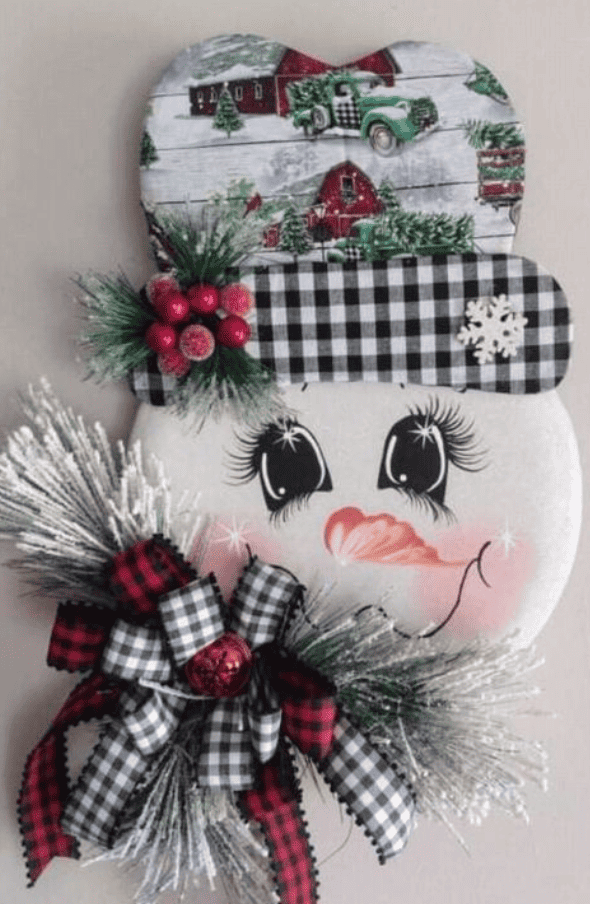
Making a wood round snowman wreath is a delightful and rustic DIY project that can add a touch of charm to your holiday decor. Here’s how to create one:
Materials You’ll Need:
Wooden round plaque or slice (available at craft stores)
White acrylic paint
Paintbrushes
Black acrylic paint or black permanent marker
Orange acrylic paint or orange permanent marker
Red ribbon or fabric for a scarf
Faux evergreen or holly sprigs (optional)
Craft glue or hot glue gun and glue sticks
Jute twine or wire for hanging
Steps:
1. Paint the Wooden Round:
Start by painting the wooden round plaque or slice with white acrylic paint. Apply two coats if necessary, allowing the paint to dry between coats. This will serve as the snowman’s face.
2. Create the Snowman’s Face:
Once the white paint is dry, use black acrylic paint or a black permanent marker to draw two coal-like eyes and a smiling mouth on the wooden round to create the snowman’s face.
Use orange acrylic paint or an orange permanent marker to paint or draw a carrot-shaped nose below the eyes. Another option is to use a Snowman svg file.
3. Add the Scarf:
Cut a piece of red ribbon or fabric to create a scarf for your snowman. Tie it around the wooden round just below the “face.” You can knot it to make it look like a real scarf.
4. Attach the Hanging Mechanism:
On the back of the wooden round, attach a loop of jute twine or wire to serve as a hanger for your wreath.
5. Optional Embellishments:
If you’d like to add some extra festive flair, you can glue on faux evergreen or holly sprigs around the top of the wooden round to create a “wreath” effect. Make the hat by cutting cardboard or wood and covering with your desired pattern and material.
6. Hang and Display:
Once your wood round snowman wreath is complete, hang it on your front door, above your fireplace, or in any other spot where it can spread holiday cheer.
This DIY wood round wreath snowman Christmas craft is a versatile decoration that can be customized to match your holiday decor style. It’s a warm and welcoming addition to your home during the winter season, sure to bring smiles to all who see it.
14. Wood Round Christmas Wreath
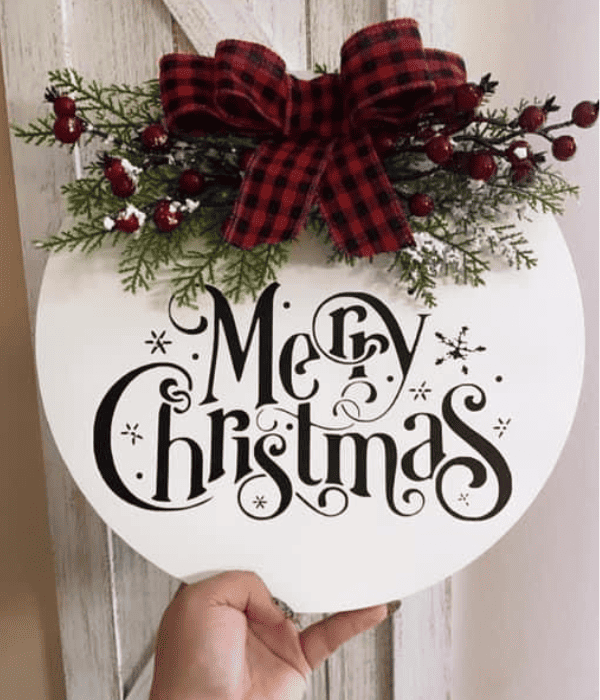
Creating a wooden round “Merry Christmas” wreath is a lovely and personalized way to welcome the holiday season into your home. Here’s how you can make one:
Materials You’ll Need:
Wooden round plaque or slice (available at craft stores)
Acrylic paint in festive colors (e.g., red, green, white, gold)
Paintbrushes
Stencils or letter stickers
Pencil
Red or green ribbon
Craft glue or a hot glue gun and glue sticks
Jute twine or wire for hanging
Optional: Decorative elements like bells, holly, faux greenery, or ornaments
Steps:
1. Paint the Wooden Round:
Begin by painting the wooden round plaque with a background color that complements your holiday decor. Red, green, white, or gold are popular choices. Apply two coats if necessary, allowing the paint to dry between coats.
2. Plan Your Design:
Using a pencil, lightly sketch out the words “Merry Christmas” on the wooden round. You can either freehand the letters or use stencils or letter stickers for a more precise look. Ensure that the letters are centered and evenly spaced.
3. Paint the Letters:
Carefully paint the letters with a contrasting color (e.g., white, black, or gold) using a fine paintbrush. Take your time to ensure neat and even lettering. Allow the paint to dry completely.
4. Add Decorative Elements (Optional):
If you’d like to enhance the wreath’s appearance, you can attach decorative elements such as bells, holly sprigs, faux greenery, or small ornaments. Arrange them to your liking and secure them with craft glue or a hot glue gun.
5. Attach the Ribbon:
Cut a length of red or green ribbon and loop it through the top of the wooden round plaque to create a hanger. Tie a knot or bow to secure it firmly.
6. Create a Hanging Mechanism:
On the back of the wooden round, attach a loop of jute twine or wire to serve as a hanger for your wreath.
7. Hang and Display:
Your wooden round “Merry Christmas” wreath is now ready to be hung on your front door, above your fireplace, or in any other location where it can bring holiday cheer to your home.
This DIY wooden round wreath Christmas craft offers a way to add a personalized and festive touch to your holiday decor. You have the freedom to customize the colors and decorations to match your unique style and create a warm and inviting atmosphere during the holiday season.
15. Reindeer Wood Craft
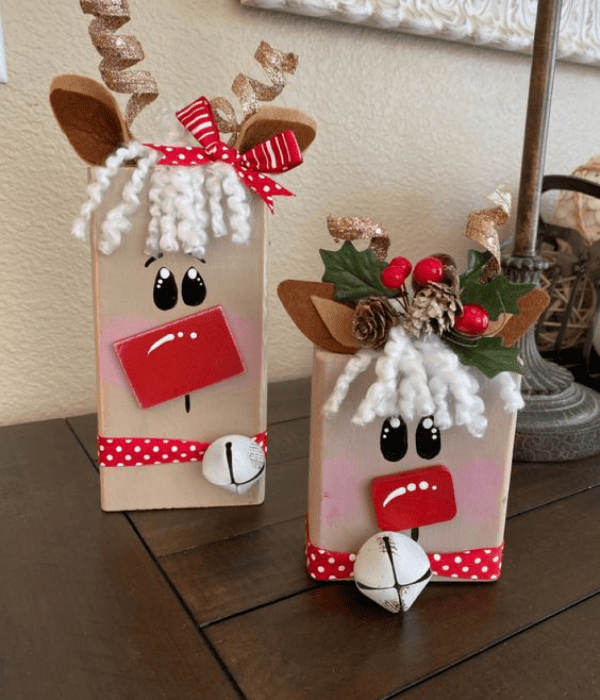
Reindeer wood blocks are a versatile holiday craft that can be used as decorations, table centerpieces, or even as part of your gift wrapping. Here’s how to make reindeer wood blocks:
Materials You’ll Need:
Wooden blocks or cubes (available at craft stores)
Brown acrylic paint
Paintbrushes
Black acrylic paint or black permanent marker
Red acrylic paint or red permanent marker
Googly eyes
Craft glue or a hot glue gun and glue sticks
Small decorative elements like jingle bells, ribbon, or faux greenery (optional)
Steps:
1. Paint the Wooden Blocks:
Begin by painting the wooden blocks with brown acrylic paint. Apply two coats if necessary, letting each coat dry completely before moving on.
2. Create the Reindeer Faces:
Once the brown paint is dry, use black acrylic paint or a black permanent marker to draw the reindeer faces on the wooden blocks. Each block will represent one reindeer. Draw eyes, a smiling mouth, and antlers.
3. Add a Red Nose:
To create Rudolph the Red-Nosed Reindeer, use red acrylic paint or a red permanent marker to give one of the reindeer a red nose. You can leave the others with black noses or alternate for variety.
4. Attach Googly Eyes:
Glue googly eyes onto the reindeer faces using craft glue or a hot glue gun.
5. Optional Embellishments:
If you’d like to add extra flair to your reindeer wood blocks, you can glue on small decorative elements like jingle bells as “collars” or ribbon around their necks. Faux greenery or holly can be added for a festive touch.
6. Let Them Dry:
Allow your reindeer wood blocks to dry completely before handling or displaying them.
7. Display and Enjoy:
Arrange your reindeer wood blocks on a mantel, shelf, or table as part of your holiday decor. You can also use them as placeholders for a festive table setting or incorporate them into your gift wrapping for a personalized touch.
These reindeer wood blocks are a charming and versatile addition to your holiday decorations. They can be customized to suit your style and are sure to bring a smile to your face during the festive season.
16. Wood Pallet Christmas Decor
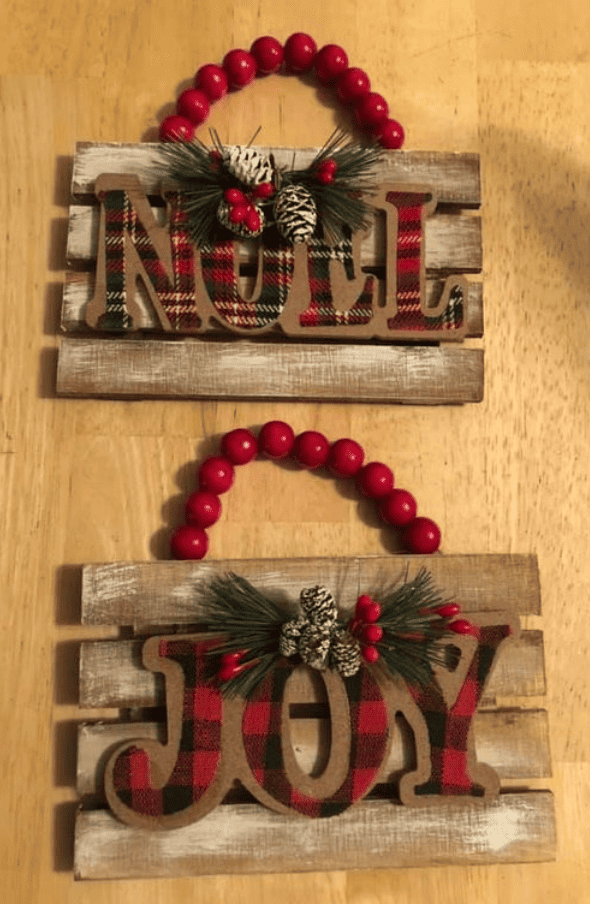
Wood pallet “Joy” and “Noel” Christmas signs is a rustic and festive DIY project that can add a cozy touch to your holiday decor. Here’s how to make these signs:
Materials You’ll Need:
For Both Signs:
Wooden pallet (you can find at Dollar Tree)
Brown stain
Paintbrushes
Wood Letters
Craft glue or a hot glue gun and glue sticks
Twine or wire for hanging
Optional: Decorative elements like jingle bells, faux greenery, or pinecones
Steps:
1. Stain the Background:
Choose a background color for your signs. Common choices are wood stain, white, red, or green. Apply two coats of paint or stain, letting each coat dry completely.
4. Plan Your Design:
Decide on the placement and size of the letters for “Joy” and “Noel” on your signs.
5. Paint the Letters:
Paint the letters for “Joy” and “Noel” onto the signs in brown or with a contrasting color (e.g., red or green). Allow the paint to dry completely.
6. Add Decorative Elements (Optional):
To enhance the rustic charm of your signs, consider attaching decorative elements like jingle bells, faux greenery, or pinecones. Use craft glue or a hot glue gun to secure them in place.
7. Attach Hanging Mechanism:
On the back of each sign, attach a piece of twine or wire to serve as a hanger.
8. Let Them Dry:
Allow your “Joy” and “Noel” Christmas signs to dry completely before handling or displaying them.
9. Display and Enjoy:
Hang your festive signs on your front door, above your fireplace, or in any other spot where they can spread holiday cheer. They can also be displayed indoors on walls or as part of your holiday table decor.
These wood pallet “Joy” and “Noel” Christmas craft signs add a touch of rustic elegance to your holiday decorations. They can be customized with your preferred colors and embellishments, making them a warm and welcoming addition to your festive home.
17. Festive Table Christmas Centerpieces
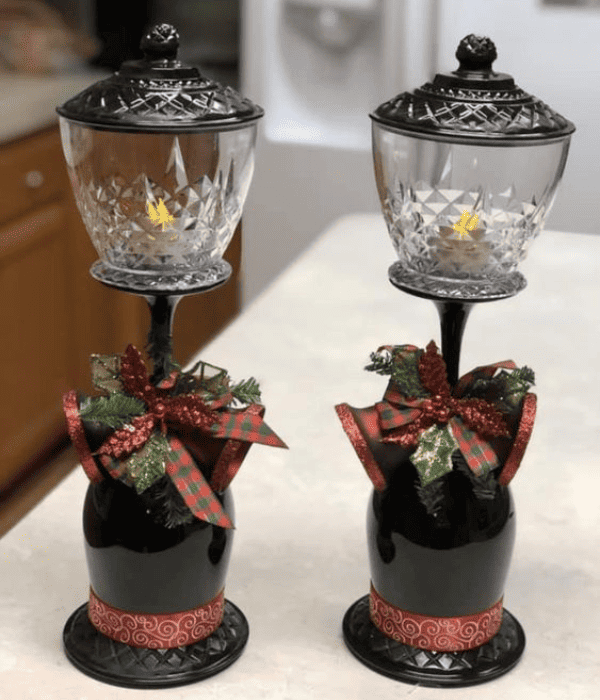
Wine glass Christmas centerpieces are a creative and elegant way to decorate your holiday table. These centerpieces can be customized to match your holiday theme and are sure to impress your guests. Here’s how to make wine glass Christmas centerpieces:
Materials You’ll Need:
Wine glasses (choose a variety of shapes and sizes)
Festive ornaments or decorative elements (e.g., mini ornaments, pinecones, holly berries, faux snow, ribbon)
Taper candles or tea lights
Craft glue or a hot glue gun and glue sticks
Small glasses
Tablecloth or placemats (optional)
Paint or Spray Paint
Steps:
1. Prepare Your Work Area:
Lay down a tablecloth or placemats to protect your table from any glue or wax drips.
2. Choose Your Wine Glasses:
Select a variety of wine glasses in different shapes and sizes to create visual interest in your centerpiece.
3. Decorate the Glasses:
Begin by painting and decorating the wine glasses. You can use craft glue or a hot glue gun to attach festive ornaments, mini pinecones, holly berries, or other decorative elements to the stems and bases of the glasses. Be creative and mix and match elements to create a cohesive look.
4. Add topper
Flip wine glass over and attach a decorative glass to the wine glass using E6000. Add LED tealights in each and add the topper to cover it.
5. Create Your Centerpiece:
Arrange the decorated wine glasses in the center of your table to create a stunning centerpiece. You can group them closely together or space them out depending on the size of your table and the desired look.
6. Enjoy Your Festive Table:
Your wine glass Christmas centerpieces are now ready to enhance your holiday table decor. They provide a beautiful and unique focal point for your festive gatherings.
These wine glass Christmas centerpieces are not only a visually appealing Christmas craft but also easy to customize to your preferred color scheme and theme. They’ll create a warm and inviting ambiance for your holiday celebrations.
18. Melted Snowman
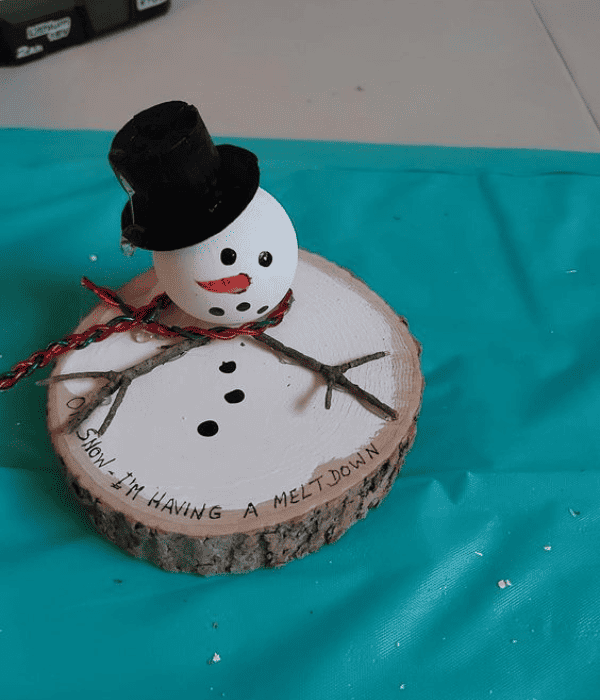
Creating a melting snowman sitting on a wood slice is a charming and whimsical holiday craft. It can serve as a cute decoration for your home or as a unique gift. Here’s how to make one:
Materials You’ll Need:
Wood slice (you can find these at craft stores or make your own)
White acrylic paint
Paintbrushes
Black acrylic paint or black permanent marker
Orange acrylic paint or orange permanent marker
Craft glue or a hot glue gun and glue sticks
Small twigs or toothpicks
Small, colorful buttons
Felt or fabric scraps in various colors (for a scarf and hat)
Small decorative elements like mini ornaments, faux holly, or ribbon (optional)
Optional: Clear sealer spray
Ping pong ball
Steps:
1. Paint the Wood Slice:
Begin by painting the wood slice with white acrylic paint in the center of the wood to create the snowy background. Apply two coats if necessary, letting each coat dry completely.
2. Create the Snowman:
Paint a ping pong ball white. Once the paint is dry, use black acrylic paint or a black permanent marker to draw the snowman’s eyes, mouth, and buttons onto a ping pong ball.
Use orange acrylic paint or an orange permanent marker to draw a carrot-shaped nose just below the eyes.
3. Craft the Melting Effect:
To create the melting effect, attach the ping pong to the wood slice with hot glue.
4. Add the Twigs or Arms:
Attach small twigs or toothpicks as the snowman’s arms. You can glue them in place using craft glue or a hot glue gun.
5. Make a Scarf and Hat:
Create a scarf and hat for your snowman using scraps of felt or fabric in the colors of your choice. Glue the scarf around the snowman’s “neck” and shape the hat to fit on the top of its “head.”
6. Decorate (Optional):
If you’d like to add extra details to your snowman, you can glue on small decorative elements like mini ornaments, faux holly, or ribbon.
7. Optional Seal (Optional):
To protect your creation and give it a finished look, you can spray it with a clear sealer spray. Allow it to dry completely.
8. Display Your Melting Snowman:
Your melting snowman sitting on a wood slice is now ready to be displayed on a mantel, shelf, or table as a delightful holiday decoration.
This adorable craft captures the whimsy of a melting snowman and adds a touch of holiday cheer to your home. It’s a fun Christmas craft for both adults and kids, and you can customize it with your preferred colors and decorations to match your holiday decor theme.
19. Holiday Scrabble Tiles
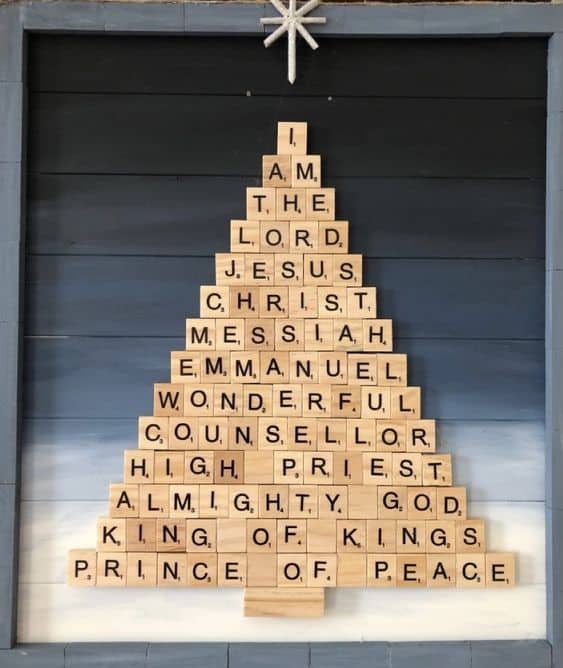
A holiday Scrabble tile Christmas tree with a focus on Jesus is a meaningful and crafty way to celebrate the true spirit of Christmas. Here’s how to make one:
Materials You’ll Need:
Scrabble tiles (you can purchase a Scrabble game for this purpose)
Hot glue gun and glue sticks
Wooden dowel or sturdy stick
Craft paint and brushes
Small star-shaped topper
Gold or yellow craft paper or fabric (for the star)
Bible verses or quotes related to Jesus (optional)
Wood Frame
Steps:
1. Arrange the Scrabble Tiles:
Arrange the Scrabble tiles onto the wood frame to form the shape of a Christmas tree. You can spell out words or phrases related to Jesus, such as “Emmanuel,” “Savior,” or “Prince of Peace.”
3. Paint the Scrabble Tiles (Optional):
If you’d like, you can paint the Scrabble tiles in festive colors or add decorative patterns, or leave them in their natural state. Allow the paint to dry completely before proceeding.
4. Glue the Scrabble Tiles:
Use a hot glue gun to secure the Scrabble tiles in place on the felt or fabric base, forming the tree shape.
5. Add a Star Topper:
Create a small star-shaped topper using gold or yellow craft paper or fabric. Glue it to the top of the wooden dowel or stick.
6. Decorate (Optional):
If desired, decorate your Scrabble tile Christmas tree with small wooden beads, mini ornaments, faux holly, or ribbon. These embellishments can add a festive touch.
7. Include Bible Verses or Quotes (Optional):
You can further emphasize the message about Jesus by adding small Bible verses or quotes related to the Christmas story. Attach these verses or quotes around the tree with hot glue or by using small decorative paper tags.
8. Display and Reflect:
Your holiday Scrabble tile Christmas tree with a focus on Jesus is now ready to be displayed as a reminder of the true meaning of Christmas. Place it on a tabletop, mantel, or any other prominent location in your home.
This meaningful Christmas craft project not only serves as a lovely Christmas decoration but also provides an opportunity for reflection on the spiritual significance of the holiday season. It can be a wonderful addition to your holiday decor, serving as a reminder of the birth of Jesus, the reason for the season.
Christmas Crafts will save you so much money on your Christmas Decorations and Christmas Gifts!
Christmas crafts are a cherished tradition that adds a special touch of warmth and creativity to the holiday season.
Whether it’s creating handmade ornaments, crafting festive wreaths, or assembling thoughtful gifts, these DIY projects allow us to express our love and joy for the season while spending quality time with family and friends.
Christmas crafts not only bring a unique and personalized charm to our homes but also serve as a reminder of the true spirit of the holidays: sharing, giving, and celebrating the love and togetherness that define this magical time of year. Save money using items found right at your local Dollar Store.
So, roll up your sleeves, gather your supplies, and let your creativity shine as you embark on crafting your way to a heartwarming and joyful Christmas season!
I liked all your ideas for Christmas. Thank you for sharing your creative ideas
Merry Christmas
You’re most welcome!
Beautiful crafts for Xmas thanks for sharing 🥰
You’re welcome! Happy to share!
I love that your wide selection of decorations included one about who Jesus was – the true meaning and origin of Christmas.
Thank you!
So, glad you love it, I agree Jesus is the reason for the season 🙂